
The Stage
The stage is in the top right of the editor. This is where our creation will come alive! Some examples of what we can do in this space are, we can add sprites, change the background image, show text, show variables (score, time left to play, players name), and it is where the user can click to interact with what we have made.
The space on the stage is organised by a coordinate system. Have you ever played the game battle ships? The battleships board has a grid on it, with columns and rows being represented by the alphabet (A-J), and numbers 1-10. So we can read the coordinate giving the letter and number i.e. A-10.
Scratch is a bit like this system, we care about both the horizontal axis (left to right) and the vertical axis (top to bottom). The horizontal axis is called the x axis and the vertical axis is called the y axis. So to give a coordinate we can say x:20, y:-100. From the centre of the stage is zero for both the x and y coordinates.
The black line shows the x axis, the red line shows the y axis:
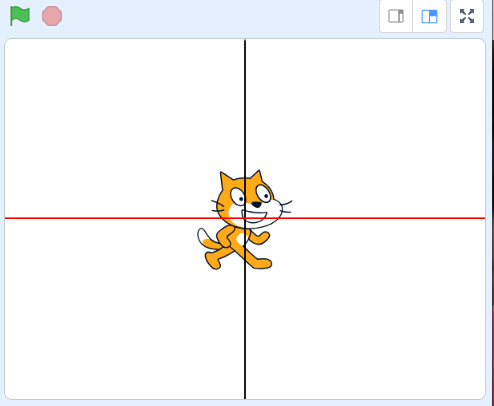
Both the x and y coordinates start in the middle of the stage at o/ zero. Do you see where they x and y axis cross over? This is x:0, y:0.
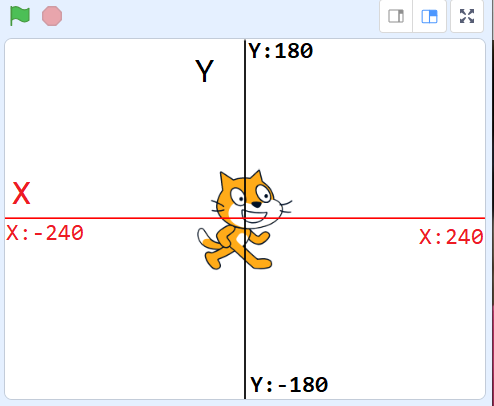
On the left of the stage the horizontal axis (x axis) is at the position x:-240. From here we move along the horizontal axis increasing the value of x until we get to the centre of the stage at x:0, then we keep going until we reach the right hand side of the stage at x:240.
At the top of the stage is the y axis starts at y:180, it decreases in value as we move down the stage. When we get half way down of the stage the y axis becomes y:0. From the centre as we move down more the y value keeps decreasing, until we reach the bottom of the stage at y:-180.
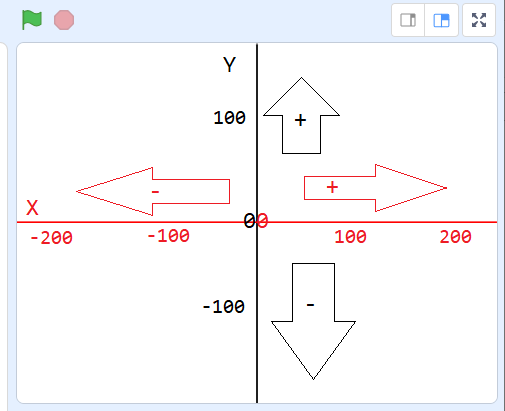
Another example of the numbering of the x axis and y axis:
Quick Look
The next video is a quick look at the Scratch editor. Below the video I will describe each section so you can easily look back later if you want to check something.
Sprites
Sprites are the characters and things we place in our creation. To add a sprite to our stage, we can:
- Upload a sprite we made (away from Scratch)
- Click Surprise !
- Paint a sprite
- Choose from a library of sprites available in Scratch – animals, people, fantasy, dance, music, sports, food, fashion & letters
Sound
We can attach a sound to a sprite or a backdrop. For example we could have a sound to play when the game starts attached to the backdrop. We could have a sound that sounds like a galloping horse that we attach to the horse sprite.
Sprites and backdrops can only play the sound they have attached to them, they cannot play a sound attached to another sprite or backdrop.
To add a sound to our project we can:
- Upload a sound we created (away from Scratch)
- Click Surprise !
- Record a new sound in Scratch
- Choose a sound from a catalogue of sounds available in Scratch – animals, effects, loops, notes, percussion, space, sports, voice & wacky
Sound is such a powerful thing. In our creations, sound is a brilliant way to help tell a story, to make a game more fun to play, and to keep the player interested in playing our game until the game ends.
We could play a music tune when the game starts, if our sprite collects coins in the game maybe a sparkly/fun sound plays, if we click on a picture of a guitar maybe some guitar chords are played.
The next time you play a computer game, listen carefully see how many different sounds you can count!
Backdrops
Backdrops are a brilliant way to help tell a story. A backdrop may change when we play a game for many reasons such as, different levels, if we start/end a game, to progress to the next level or display a score at the end of the game.
- Upload a backdrop we made (away from Scratch)
- Click Surprise !
- Paint a sprite
- Choose from a library of sprites available in Scratch – fantasy, music, sports, outdoor, indoors, space, underwater, patterns
Code
In the previous tutorial, we looked at the different category of blocks. Blocks are the way we get our creation to do things.
We can attach code blocks to the backdrop or to our sprites. The only difference it the code available for the backdrop and the sprite is the motion blocks. Backdrops cannot move, they can only change image. This is why you cannot add any motion code blocks to a backdrop.
The blocs deal with all the things our creation knows (variables) and does (movement of sprites, maths calculations, timing events, calling events to happen….and much more).
![]()
When we think about what we want our creation to do, we will think of the best place to attach code to. As we build things in Scratch, you will see why different blocks are attached on either the backdrop or sprites depending on what we want to make our project do.
ICC Full Scratch Offering Overview
For an overview of this blog offering please click here!